Convert JPEG to Webp and Upload To Blogger Website
We are going to give some tips on how to convert JPEG image to Webp and upload to blogger website in 2020. Many people were asking this question on Facebook how we can upload the image to blogger website that is in webp format. But first lets talk about how to convert the Jpg image to Webp image with very simple method.
Jpeg image is very easy to convert to Webp image because there is free online tools available for the people like us. So without talking more lets go to the process to convert Jpeg image to Webp image. Converting process of its is given below.
Convert JPEG Image To Webp Image
First you have to open website.
Website Link :- https://hnet.com/jpg-to-webp/
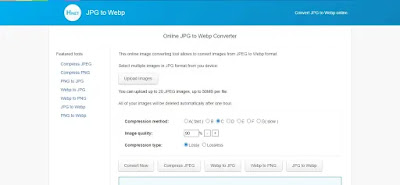
After you open that website you will see interface like image that is given below.

Steps :
- You will see Upload Images Button there.
- Click on Upload Images to upload the JPEG image.
- There you will also Compression Method, Image Quality(Change quality from 90% to 70% or change it according to your will.) and Compression Type.
- Don't change other setting.
- Now Click on Convert Now to convert JPEG image to Webp image.
Importance of Converting JPEG Image To Webp Image.
- It increase your website performance and speed.
- It has good compression then other format compression.
- The image quality is not decreases much.
- Image loads very fast in comparison to JPEG format image and many more.
How To Upload Webp Image To Blogger Website
First Go to your blogger dashboard and Scroll down below and Change to Legacy Blogger by clicking on Revert to Legacy Blogger.

After that Click on any post to edit it or Create a new post.
Now You will See image icon in top left. Click there and It will ask to upload from from computer and many more. There you have to Select where you have saved your Webp Image.
In our case we have saved our image in computer. So we are selecting choose files or Click on Choose Files. Now Locate your Webp image that you want to upload in your website and Double click on it.
Now at last Click on insert to insert the image to your image to your page or post.
Conclusion
In the above we gave tips on how we can convert JPEG image to Webp image in a simple method. There were other method also we thought that it will be boring and difficult for you so we did not include it here. You can share it with your friends so that they also know how to convert JPEG image to Webp image.


Post a Comment
---[[ For More Inquiry Comment Down Below or Contact Us ]]---